Email Profiles
Email Profiles are used to customise the email address used for sending, where email replies get sent and also what happens when people click on the unsubscribe link.
Creating multiple Email Profiles is useful for keeping transactional emails separate from Email Campaigns and they are also really good for managing different brands or departments within one account.
A more basic usage of multiple Email Profiles is when you want to change the sending email address depending on the type of Email Campaign e.g. The monthly newsletter is sent from one person and product update emails are sent from a different person.
Email Profile Benefits
- Set-up an unlimited number of custom sending and tracking domains
- One-time set-up reduces ongoing testing
- Monitored every hour by the System Monitor
- Choose which Email Profile to use when creating Email Templates
- Control what happens when Users click the 'unsubscribe' link
- Turn on additional features such as...
- Google Analytics link tagging
- Reply tracking
- Share with friends
Creating Email Profiles
This screen contains hover help tips to explain more about what each setting relates to.
- Expand the "Templates" section in the sidebar.
- Click "Email Profiles".
- Click the "New Email Profile" button in the top right.
- Fill out the relevant fields.
- Click "Save Changes".
From Address / Domain Authentication
Authenticating your own domain removes the risk of other senders impacting on your campaigns and ensures the best delivery and engagement rates are achieved.
Using your own domain means you can align the 'From Email Address' with brand identity and send from <anything>@yourdomain.com.
Here's an example from Pinterest using a subdomain of 'explore' on their primary pinterest.com domain.

Domain authentication is a simple setup process using DNS records and to read more about the features and benefits of using custom sending and tracking domains, click here.
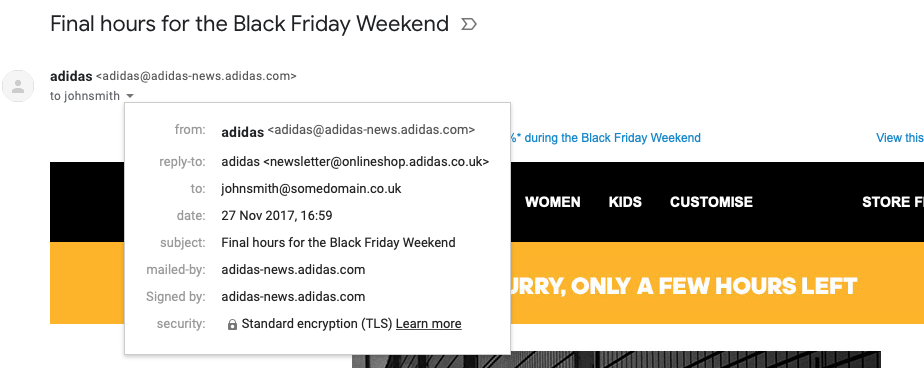
Email Replies
The email address used to send from is independent to where replies are sent and there are a number of further customisation options to choose from.
The default setting is to enter the email address of where you would like replies sent to but to find out more about tracking email replies or enabling auto-responders, click here.
Here's an example showing the 'From' and 'Reply' email addresses independently.
Opt-out Links
What happens when people click the unsubscribe link is controlled by the settings stored within the Email Profile used when the message was sent.
Within the settings of an Email Profile you can specify the the level of opt-out required...
- Global Suppression (no more email)
- List Level (opt-out of the List(s) used)
- Email Profile Suppression (suppression whenever the selected Email Profile is used)
Customising Opt-out Links
The default setting is to process opt-out requests instantly and then to display a confirmation message in a web page.
For more information on the available options for customising this process, click here.
Opt-out Landing Pages
When an unsubscribe link is clicked the default option is to process the opt-out request then display a generically branded opt-out page that is hosted on the tracking domain.
The generic opt-out page is default functionality and does not require any setup work. The header image and branding colours used are loaded directly from the account settings.
The process of how the generic opt-out page operates can be customised within the Email Profile using options listed in the "Opt-out" section and includes...
- Setting the default language (can be changed by the user viewing the page)
- Hiding or showing the account header image
- Gathering feedback using an exit survey
This generic page also provides a link where people can report cases of abuse. Any reports are collected and displayed in the related Campaign or Workflow report and they are also forwarded on as physical emails to the abuse email set in your account details setup.
Instant Opt-out Page Customisation
Email Profiles also support linking opt-out clicks directly to Forms.
Using this feature allows you to design an opt-out confirmation page to replace the generic default page layout.
Preference Centres
These types of landing pages can be used to allow people to update their details and set their own email preferences - or opt-out entirely if that's what they want to do.
For more info on how to create preference centres, click here.
Google Analytics
Enabling Google Analytics within an Email Profile results in all links on sent emails being tagged as per the specification below.
Campaign Emails
utm_source=email_marketing

utm_medium=email

utm_campaign="Campaign Code" or "Description" where Campaign Code is not set

utm_content=YYYY-MM-DD
Workflow Emails
utm_source=workflow

utm_medium=email

utm_campaign=Workflow Description and Email Description. Launch ID is also included where relevant.

utm_content=YYYY-MM-DD
With Google Analytics enabled, this link...
http://mywebsite.com/contact
would have this content appended...
?utm_source=email_marketing&utm_medium=email&utm_campaign=ABC-123&utm_content=2021-09-06
Custom Link Tagging
When websites require something more custom there's the option to define additional information to automatically tag onto every link within an email when it gets sent.
Tagging parameters onto links can sometimes cause issues with web pages loading. To find out how to disable tracking on individual links click here.
This approach enables custom values to be defined and it also allows User record information to be merged using standard merge tags.
An example of where custom link tagging could be used when a website needs to track a customers session by their reference.
Setting custom link parameters of...
ref={?$contacts_reference?}&membership={?$contacts_data_1?}
would result in values for each person being merged onto their email links...
ref=CUST-001212&membership=gold
Email Reply Tracking
Useful Info
- Avoid using 'noreply@' to reduce filtering
- Merge 'Reply Email Address' into content using {?$reply_email_address}
It's best practice to allow people to reply by email and using addresses that start with 'noreply' should always be avoided.
There are three options available that can be used in different ways to manage email replies depending on your requirements.
Direct to External Mailbox
This is the default option and enables replies to be sent directly to any valid external mailbox.
There's no way to track who actually sends a reply as all activity is outside of the service.
Track & Forward to External Mailbox
Tracking replies means that recipients never see the actual 'Reply Email Address' and instead see an auto-generated email address that is based on the sending domain.
For example, sending emails from hello@somedomain-mail.com would offer the recipient a 'Reply Email Address' of something like reply-2ae72h8-6rn25.36ee@somedomain-mail.com
The account name is constructed from encrypted User data so each reply can be identified and related back to individuals.
Emails forwarded using this option have the prefix TrackedReply: added so that emails can be filtered into folders for easier management.
When a tracked email reply is received this is what happens...
- the message, and any attachments, gets recorded within the application
- the message is forwarded onto the email address specified in 'Reply Email Address'
- the message details appear in the Campaign or Workflow report
- optionally cancel any queued campaigns for the recipient
All email replies are recorded upon receipt and that allows for a fake 'inbox' to be displayed in the Campaign or Workflow report.
Tracked Reply Processing Options
Use the 'Scheduled Campaigns' setting to specify how tracked reply respondents are handled. There are 3 options...
- Default setting is to do no further processing
- Choose to suppress respondent from any scheduled Campaigns - Campaigns schedule at a later time are not affected
- Option above plus opt respondent out of any Lists associated with the scheduled Campaigns and the current Campaign
Send Auto-responder & Ignore Replies
Auto-responders are useful when there's a requirement to send further information e.g. customer service telephone number, opening hours etc.
This feature uses a regular Template so that the content can be fully customised to enable sending of a branded response to any person that replies to the email they have been sent.
Webhooks
Webhooks needs to be enabled within account settings and once that's done the functionality can be overridden at an individual Email Profile level.
Overriding the settings for Email Profiles is useful when you want to send data to different places or if you want to completely disable Webhooks for specific emails.
Click here to find out more about how Webhooks operate.
Suppression
Email addresses can be imported into Email Profile Suppressions to stop people from receiving emails whenever the Email Profile is used.
Suppressions can be auto-populated by setting the 'Opt-out Type' within an Email Profile.
For more info on the options available for specifying what happens when people click to unsubscribe edit an Email Profile and go to the 'Opt-out' settings page.